Coolfogo escribió:Puedes leer la nand tamb con el progskeet o infectus pero el numero de soldaduras es mayor. Busca duagramas en google o en el foro. Yo mismo publique hace tiempo unas imagenes con el diaframa para slim.
Un saludo
Si bueno se que se usa tambien para leer la Nand, pero la pregunta es una ves que no puedes acceder a ella con el NandDump, por no detecta la flash, en vez de intentar hacer el corto con el destornillador para reseter la Nand, si es posible con el progskeet regrabar la Nand en este chip y recuperar la consola. Si que vi una foto de como montarlo para leer la Nand pero no es el uso que quiero dar, yo quiero recuperar despues de que el chip este capu, gracias.
Encontre esto:
Bad Flash To Nand ? How To Recover !
If like me you are rushing around, and accidentally flash a xenon xell image to a zephyr or other
board, then there are two things you'll notice
1) it won't power up dead as door nail.
2) the nandpro program won't recognise the flash chip any more so you can't write the correct image
to the chip. OH DEAR!!!
There is help though by shorting a couple of pins on the nand.
This is what you nand looks like, you'll notice in the top left hand corner a dimple on the chip that is
signifying pin 1.
http://www.flickr.com/photos/69907555@N03/6353188553/in/photostreamThis is what you nand looks like, you'll notice in the top left hand corner a dimple on the chip that is
signifying pin 1.
http://www.flickr.com/photos/69907555@N03/6353217423/in/photostreamThis is a shortened chip with leg/pin numbers.
the objective is to prevent the SMC from retrieving its instruction code/firmware, by shorting and
confusing the data lines.
I shorted pins 44-47 with a flat head screw driver (gash I know).
sequence of events,
I disconnected power brick,
shorted pins,
connected power brick,
un-shorted pins (removed screwdriver)
ran NandPro 2.0b. It now shows correct flashconfig again hooray!!
Pins 44-47 are I/O pins don't carry any voltage so to speak so chances or blowing something is less
but not impossible so only do this if you are completely stuck and the alternative is to remove the
chip bench program it.
Re-flashed with correct xell image booted linux flashed xbr all is fine now phew!!
here is another thing to try
This worked for me:
Unplug PSU.
Plug in PSU (1 second) nandpro usb/ltp: -e16
Nand erased then i was able to write an image to the nand, Xbox powered on again.
If this don't work for you you can try the 5v mod have a look over here.
http://forums.xbox-scene.com/index.php?showtopic=700983you shouldn't get a red light do it in this order, unplug the console bridge the pins, plug the console
in remove bridge, run nandpro no need to press the power button on the console. light should stay
orange (stand by)
Otro:
I tried the above (very elegant, btw) but it did not work. In the end, i think it is because it is very
difficult to hold the screwdriver that you use flat enough to nail all of the correct pins on that tiny
surface area (maybe my fine motor skills are shot), HOWEVER, I tried the more primitive solution
to this by shorting out ALL connectors on the chip, but the psu kept surge-suppressing. I played
around with it for a while, and found that when I shorted the pins on the left side of the chip (end
closest to the front of the xbox), the psu light would turn red and therefore kill power to the board.
When I shorted the right side of the chip (facing the south bridge), the psu didn't give out,. Just for
grins, I tried shorting the right side only, plugging in the psu, and flashing the nand. IT WORKED.
SO if your power supply keeps giving you the red light, try shorting the entire right side of the chip
in the same sequence as this solution. I'll warn you that the above way is much less dangerous, as
this method can damage your nand chip! Only try this after trying the original post!!
Otro:
Ok if you have tried the jtag hack and have been unsucessfull (Xbox wont turn on at all and
"Cannot detect a flash controller" in Nandpro) do not panic there is salvation.

You can recover from this Hell by shorting out the nand there is two methods on how to do this and
both accomplish the same thing. The first method is the one that is most recomended but is a bit
more difficult to do. what you want to do is short out pins 44 and 47 by connecting them with a
piece of wire (or anything conductive ex: screwdriver or pin)
METHOD 1
SHORTING OUT PINS 44-47
Here is a detailed diagram I have made showing the pin outs on the nand so you know which pins
you need to connect together to short it out.
The procedure for causing the short is the same for both methods and will be reviewed below
NOW THE SECOND METHOD IS A LOT EASIER BUT IS ALSO MUCH MORE LIKELY
TO CAUSE DAMAGE TO YOUR 360. USE AT OWN RISK!!!!!
This method involves getting a piece of stripped wire and laying it across all of the legs of the nand
at once. Thus causing a short and forcing the nand into a recovery mode where you can than erase
or rewrite it. below is another pic i have edited to show you what i did.
http://www.flickr.com/photos/69907555@N03/6353232893/in/photostream*Note the wire can be held in place with your index finger on one side and your middle finger
on the other while doing the procedure.
PROCEDURE
This procedure works for both methods but i am going to demonstrate Method 2 because it is
easier to execute and illistrate
Disconnect all cables from your console. Reconnect the video cable and get your wire in place
on the nand.
Pic Below
http://www.flickr.com/photos/69907555@N03/6353240919/in/photostreamNow while still holding the wire in place with your finger reconnect the power cable to the
board
This is what everything should look like
http://www.flickr.com/photos/69907555@N03/6353248617/in/photostreamNow remove the wire carefully not to touch anything on the board. (best method is to just let go of
it and pick it up after.) check your xbox 360's power bar if the light has stayed orange than you
should be fine if it turned red than the surge protect has kicked in and you need to repeat the
procedure.
Now open the command prompt and go into nandpro and test reading from the nand.
ex: C:\nandpro\nandpro lpt: -r16 test.bin 1 1
this command will attempt to dump your keyvault if you get a flash config and it succeeds than your
nand is able to read and write again.
* At this point i would suggest erasing the nand (ONLY DO THIS IF YOU HAVE PROPER
BACKUPS OF YOUR NAND)
To erase the nand go in to the nandpro directory ex: C:\Nandpro\ and type type: nandpro lpt: -e16
0 400
This will completly erase the nand than just flash your original back or the proper version of XBR
(If you flash your original back you must remove the jtag wires or the console will not boot)
Your Xbox 360 should now be alive once again.
Y esto es el esquema para la Xbox360, es para leer etc, pero me pregunto si con esto se puede regrabar la Nand que esta muerta.
Hello, with the recent release of the new Hack for the xbox360 console called "The
CPU Glitch Hack" which enables running of unsigned code on the xbox360 machine,
similar to the old known (but Limited) Jtag hack. There was a need to dump the nand of
the xbox360 in order to prepare the "Xell Reloaded" image which is console/nand
specific or maybe the "FreeBoot" image in the near future.
Dumping the xbox360 nand can be already achieved using many ways, like an LPT
cable soldered directly to the console SPI port (7 wires) in combination to the famous
and excellent application "nandpro" by Tiros which works for both LPT and USB
flashing, or using a USB homemade or commercial SPI flasher like Maximus Nand
Flasher or Xecuter NandX.
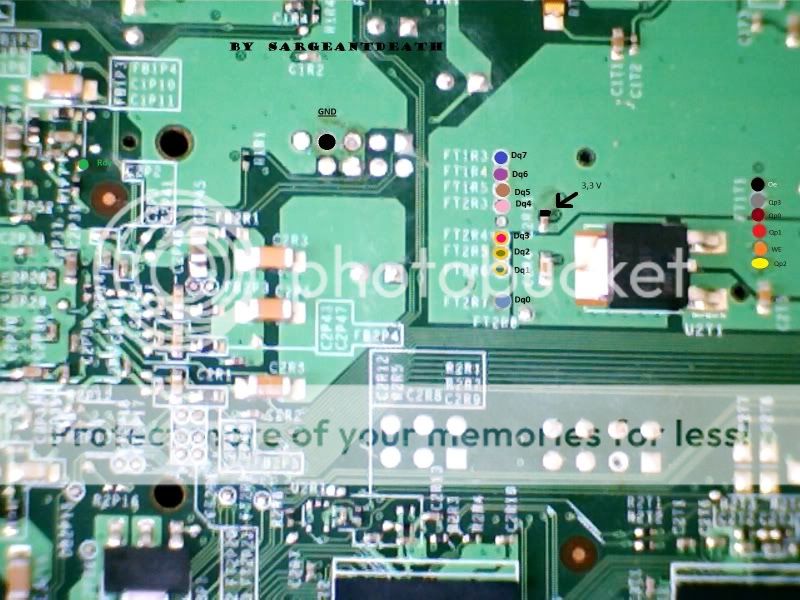
But for Progskeet owners, there was no available diagram for the Testpoints needed to
solder and dump/flash the nand with Progskeet, so I spent some time on a Slim Trinity
board in order to locate all the Nand Testpoints needed to achieve this using the famous
Flasher now: ProgSkeet
http://www.flickr.com/photos/69907555@N03/6353292705/in/photostreamThe Parameters needed for the xbox360 16mb nand with the ProgSkeet Flasher are:
Pages per block = 32
Block Count = 1024
check the "RAW" option button (without checking RAW the dump will be 16MB
instead of 16.5MB and won't work)
I have soldered ProgSkeet using this diagram and successfully dumped the nand many
times, compared the dumps (md5 check all passed)
Also I flashed the dump back to the nand without any problem, re-dumped and
compared again, all good without any issues.
Steps needed for the process:
- I have R8 removed permanently from my Progskeet (always open)
- Switch installed on R7 and in "On" position (closed)
- Wire ProgSkeet to test points.
- Plug Power cable into xbox360, Stand-by only (machine always off, this prevents the
South-Bridge from interfering with the write process)
- Open Progskeet Software on Windows XP (WinXP works better for now, Win7
compatibility problems are being fixed)
- Plug the USB cable from PC into ProgSkeet (WinXP must detect it, Driver must be
pre-installed)
- Use ProgSkeet software to read/write NAND with the correct parameters (Pages per
block=32, Block Count=1024, RAW checked)
N.B: while dumping or writing, leave the focus on the ProgSkeet Flasher and don't
touch anything until it's 100% done,
or the process may hang and you may need to restart the PC or simply unplug/replug the
USB cable.
here's a photo of the installed Flasher:
http://www.flickr.com/photos/69907555@N03/6353300771/in/photostreamPD: Si alguien lo puede traducir yo antes que usar google lo dejo asi. No se como poner las fotografias para que se vean si alguen sabe que me lo comente, un saludo.


![[img=http://img823.imageshack.us/img823/8012/imag0020o.th.jpg]](http://imageshack.us/photo/my-images/823/imag0020o.jpg/)
![[img=http://img853.imageshack.us/img853/5968/imag0021hs.th.jpg]](http://imageshack.us/photo/my-images/853/imag0021hs.jpg/)